What are 7 annual maintenance requirements for poly solar modules
Annual poly solar module maintenance: quarterly soft-brush cleaning (90% dust removal, prevents 5-10% efficiency loss), 25-30N·m bolt torque checks, 45-50V open-circuit voltage tests (±2% tolerance), IP67 junction box sealing verification, 500V DC megohmmeter insulation tests (≥100MΩ), anti-corrosion coating thickness checks (≥80μm), and thermal imaging for hot spots (<10℃ delta).
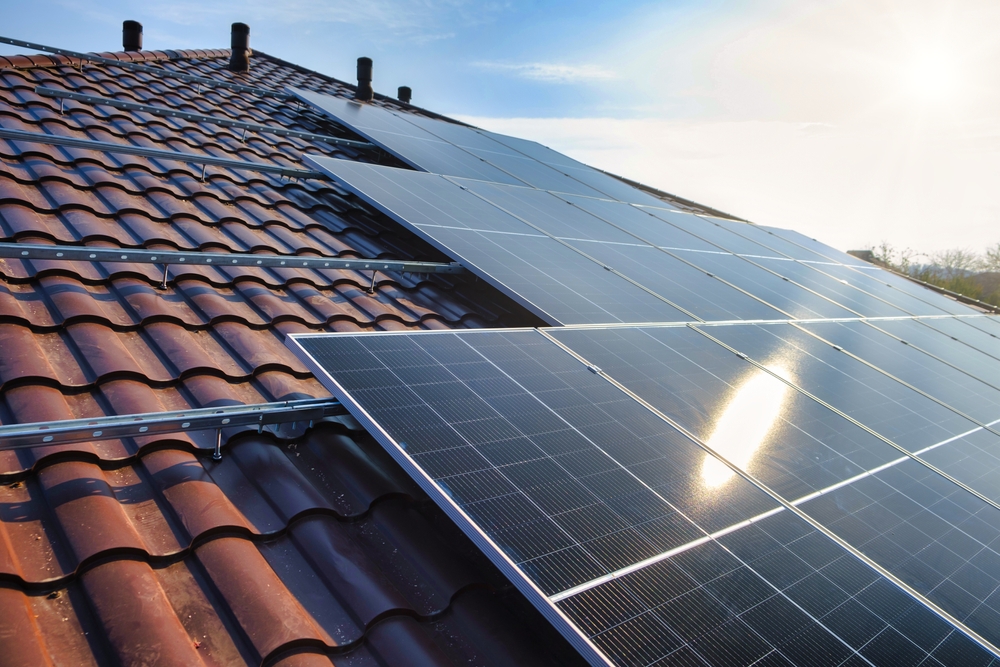
Check Module Surface Condition
Studies and real-world data consistently show that heavily soiled panels can experience efficiency losses ranging from 5% to 20% or even more, depending on local environmental factors like dust, pollen, or bird droppings. For a typical 6 kW residential system, a 15% loss translates to nearly 1 kW of power output simply vanishing, which over a month could mean missing out on roughly 90 kWh to 120 kWh of energy production.
Inspection Aspect | What to Look For | Potential Impact on Performance |
Dirt & Dust | A uniform layer of grime covering the glass surface. | Can cause a 5-15% gradual decrease in power output. |
Bird Droppings | Solid, chalky streaks that block sunlight. | A single dropping can create a significant shadow, reducing a panel's output by ~20-30%. |
Pollen/Sap | A sticky, thin film that is difficult to wash off with rain. | Reduces light transmission, leading to ~3-8% seasonal losses in high-pollen areas. |
Physical Damage | Cracks in the glass, snail trails (microcracks), or discoloration. | Cracked cells can lead to permanent power loss and may require panel replacement. |
A simple visual inspection twice a year can identify issues that, if left unaddressed, silently erode your system's financial returns. It's the most cost-effective maintenance task you can perform.
A key thing to watch for is localized soiling, like a thick patch of dust or a cluster of bird droppings. This type of soiling is often worse than a uniform layer because it can create hotspots. These hotspots occur when the shaded cells resist the current flowing from the lit cells, causing them to overheat. Over time, sustained temperatures above 85°C (185°F) in a hotspot can permanently degrade the cell's structure, leading to a long-term power reduction and potentially voiding the manufacturer's warranty.

Clean Panels with Water
Research and operational data confirm that a simple, regular cleaning can recover 95% or more of the power lost due to soiling. For a standard 6 kW residential system operating in a moderately dusty environment, neglecting cleaning for six months can lead to an average efficiency drop of ~12%, which equates to a loss of approximately 540 kWh to 720 kWh of energy production over that period. At an average electricity rate of 0.15 per kWh ,that′s 81 to $108 left on the table. Cleaning your panels every 6 months is a low-cost, high-impact activity that directly safeguards your system's annual energy yield and financial returns, ensuring you're generating the maximum power your panels were designed to produce.
Cleaning Method | Recommended Frequency | Estimated Cost (DIY) | Expected Performance Recovery |
Hose Rinse with Soft Brush | Every 6 Months | ~$0.10 per panel (water cost) | 95-98% of lost output |
Deionized Water System | Every 3-6 Months (High Dust) | ~$0.50 per panel (water + equipment) | ~99% of lost output |
Professional Cleaning Service | Annually (Pre-Summer Peak) | 5−15 per panel | ~98% of lost output |
These mineral deposits can themselves reduce light transmission by another 2-5% if left to build up. For areas with very hard water, using a deionized (DI) water filtration system attached to your hose is a worthwhile upgrade. It prevents spotting entirely, meaning you don't need to squeegee or towel-dry the panels, saving time and eliminating any risk of abrasive contact. If you must use a pressure washer, keep it on the lowest possible setting (under 35 bar or 500 PSI) and use a 40-degree wide-angle nozzle held at least 1 foot (30 cm) away from the surface.
The entire cleaning process for a typical residential array should take no more than 30 to 45 minutes. The key metric for success is a visual inspection; the glass should be completely free of streaks, film, and any visible residue. The ROI on cleaning is very high. Spending 20 annually on DIY cleaning to recover 100+ in lost energy is a 500% return, making it the most cost-effective maintenance task you can perform.
Inspect Electrical Connections
This can lead to a 3-8% power loss in a single string of panels and, in severe cases, becomes a significant fire hazard. Data from maintenance reports indicates that over 25% of system underperformance issues not related to soiling can be traced back to faulty connections, combiner boxes, or DC isolators. For a commercial installation, a single faulty connection causing a 5% loss on a 100 kW system represents a 5,000 kW annual energy deficit, costing over 750 per year at 0.15/kWh.
Conduct this inspection during low-light conditions, either early in the morning or in the evening, after the system has been shut down completely using the AC and DC isolators. Warning: Always shut off the DC power at the inverter first, then the AC disconnect switch. Lock out both switches to prevent accidental re-energization. Your initial check should be a visual one. You are looking for obvious signs of wear, damage, or corrosion.
l Look for discoloration, melting, or cracking on the plastic housing of MC4 connectors and cable insulation. A brownish or blackened hue is a sure sign of overheating.
l Check for green or white powdery corrosion on the metal contacts within connectors or inside the combiner box, especially in humid coastal environments.
l Ensure all cable connections are finger-tight but avoid over-tightening with tools unless you have a torque wrench set to the manufacturer's specification, typically between 2.0 and 4.0 Nm.
A hot connection is a bad connection. Perform a thermal scan during peak production hours, ideally when the system is operating at 80% load or higher. A connection that is 10°C (18°F) to 20°C (36°F) hotter than the surrounding connections under the same load indicates significant resistance and must be addressed immediately.
For a homeowner, renting a basic thermal camera for a 4-hour period costs approximately $150, which is a small price to pay for identifying a fault that could cause thousands in damage. Any connector showing signs of heat damage must be replaced, not just re-tightened. The degraded metal will continue to cause resistance.
Remove Shading Obstructions
A shadow covering just 5-10% of a panel's surface can reduce the power output of that entire panel by 30-40%, and if that panel is part of a string, it can drag down the output of the entire chain. For a homeowner, a single growing tree branch that casts a shadow for 3 hours a day can reduce the system's annual energy production by 8-12%. On a 6 kW system, that translates to a loss of roughly 700-1000 kWh per year, or about 100−150 in wasted electricity bills.
The most critical time to assess shading is during the solstice periods (around June 21 and December 21) when the sun's path is at its highest and lowest points, respectively. This allows you to identify potential shading issues for the entire year. You don't need complex tools to start; simply observe the array's shadow pattern throughout the day.
l Morning (8-10 AM) and Afternoon (4-6 PM): Check for long, oblique shadows from fences, chimneys, or distant trees.
l Midday (10 AM - 2 PM): Look for shadows from objects directly above or south of the array, like vent pipes, satellite dishes, or accumulated debris.
For a more precise analysis, use a solar pathfinder tool or a smartphone app like Sun Surveyor. These tools use your location and camera to overlay the sun's trajectory for all seasons, helping you predict shading months in advance. The financial calculation for removal is straightforward. Hiring an arborist to trim branches might cost 200−500, but if it recovers 900 kWh of annual production ($135/year), the payback period is just 2-4 years, after which it's pure financial gain.
Obstruction Type | Typical Power Loss | Recommended Action | Approx. Action Cost & Frequency |
Thin Tree Branches | 10-30% (per affected string) | Trim branches back by 2-3 meters | 200−400 / Annual |
Leaf Litter Buildup | 5-15% (localized panel) | Clean with soft brush (see Section 2) | $0 (DIY) / Seasonal |
Vent Pipe/Chimney | 20-40% (on 1-2 panels) | Not usually removable; consider panel re-layout | N/A |
Dust/Debris on Adjacent Panel | 5-10% (cascading effect) | Clean entire array | $0 (DIY) / Semi-Annual |
If the shading is from a permanent structure that cannot be removed, technological solutions exist. The most effective is using microinverters or DC power optimizers instead of a traditional string inverter. These devices isolate the performance of each panel, so a shadow on one module doesn't drag down the entire system. Retrofitting an existing 6 kW string system with power optimizers can cost 1,500−2,500 but can reclaim nearly all of the 20%+ losses caused by persistent partial shading, paying for itself in 7-10 years depending on the severity.
For new installations in partially shaded areas, these technologies are often essential for maximizing ROI. Remember, the goal is to have zero shadows on the array between 9 AM and 3 PM, the peak production window that generates over 80% of your daily energy.
Verify Mounting Structure Stability
During high-wind events, which can exert pressures exceeding 50 psf (2.4 kPa) on a panel surface, a single failed bolt can lead to catastrophic failure. Industry data suggests that over 15% of insurance claims related to solar systems involve damage from wind-dislodged arrays, often stemming from corroded or loose mounts. The cost to re-secure a few loose brackets is minimal, but the average claim for repairs and roof damage is over $5,000. A simple annual visual inspection, coupled with a check after any extreme weather event with winds surpassing 50 mph (80 km/h), is a critical preventative measure that protects your roof, your investment, and your neighborhood.
Start your inspection from the ground using binoculars to get a general overview before considering accessing the roof. Look for any obvious signs of movement, misalignment, or rust. Once safely on the roof (using proper fall protection), focus on the key connection points. The goal is to identify any corrosion or movement that could compromise the system's integrity over the next 5-10 year period.
l Check for rust or corrosion on galvanized steel or aluminum brackets, especially at screw penetration points and where different metals contact each other (galvanic corrosion). Even surface rust can reduce the thickness and strength of a bracket by 1-2% annually in humid climates.
l Inspect the tightness of all bolts and lag screws connecting the rails to the mounts and the mounts to the roof. Use a torque wrench to verify they are still at the manufacturer's specified value, which is typically between 15-20 ft-lb (20-27 Nm) for roof attachments. A bolt loosened by just 10% can reduce its clamping force by over 30%.
l Look for wear or cracking in the roof sealant around mounting foot flashings. A cracked or shrunken sealant bead can allow up to 1/4 inch (6 mm) of water ingress per year, leading to costly roof leaks long before the panels themselves fail.
For a typical residential array with 20-30 mounting points, this inspection should take a qualified person no more than 45-60 minutes. The following table outlines common issues, their implications, and solutions:
Issue Observed | Potential Risk | Recommended Action & Frequency |
Surface Rust on Brackets | Loss of structural integrity over 5-10 years | Light sanding and application of zinc-rich paint. Check every 2 years. |
Loose Lag Bolt (10-20% below torque spec) | Mounting foot loosening under 40+ mph wind load | Re-torque to manufacturer's specification (e.g., 18 ft-lb). Check annually. |
Cracked/Deteriorated Roof Sealant | Water penetration causing 2k−5k in roof repair | Scrape out and re-apply high-quality urethane sealant. Check every 3 years. |
Worn Rail End Clamps | Panel shifting under thermal expansion/contraction | Replace clamps and ensure 1-2 mm of gap for expansion. Check every 5 years. |
Any sign of significant corrosion, such as a bracket that has lost over 10% of its original thickness, requires immediate replacement. The cost of a single new stainless steel bracket is around 15−25, while the cost of not replacing it could be the entire array.
For most homeowners, this is a job best left to the original installer or a qualified technician. They have the specific torque specs, the correct replacement parts, and the safety training to perform the work without causing damage to the roof or the modules. This 150−300 annual service is a minor line item in your maintenance budget that ensures the $20,000+ system remains securely anchored for its entire 25-year lifespan.
Review System Performance Data
For instance, a consistent 5-7% deviation in a string's output compared to others, or a gradual 0.5% per month decline in overall efficiency, are early warnings of potential connection faults, underperforming modules, or inverter irregularities. For a 10 kW commercial array, ignoring a 5% performance dip means losing 500 W of capacity, which translates to roughly 180 kWh of lost production per month or about 27 inmissed saving sat a 0.15/kWh rate. Setting aside just 15 minutes each week to scrutinize this data can pinpoint issues that would otherwise remain hidden, allowing for targeted maintenance that preserves your system's 25-year productivity and financial returns.
Most modern inverters and monitoring platforms provide string-level or even module-level data. A key metric to track is the performance ratio (PR), which is the ratio of actual energy output to the theoretical maximum output under the measured sunlight and temperature conditions. A consistently high PR, say 85% or above, indicates a healthy system. A drop in PR to 78-80% signals that losses are occurring, and you need to investigate further. Drill down into the daily output graphs. A healthy curve should be smooth and bell-shaped on a sunny day. Look for these anomalies: a 15-20% lower peak than expected, a jagged curve with frequent dips (indicating intermittent shading or connection issues), or a production drop that occurs at the same time every day (pointing to a new, fixed shading object). Inverter efficiency is another critical data point. Most modern string inverters operate at 97-99% peak efficiency. If you see the inverter's reported efficiency consistently dropping below 95% during peak sun hours, it could be a sign of internal component degradation or that the inverter is frequently throttling due to overheating.
Temperature plays a huge role. Panel output typically decreases by about -0.3% to -0.5% per degree Celsius above the standard test condition of 25°C (77°F). On a hot 35°C (95°F) day, you can expect a 3-5% power reduction compared to a cooler, sunny day. Don't panic about this; it's normal. The real value of monitoring is in tracking trends over 6-12 month periods. Use the platform's built-in analytics to generate monthly or yearly reports. A gradual year-over-year output decline of 0.5-0.8% is typical due to module degradation. However, if your report shows a 2% or greater decline from one year to the next, it's a strong indicator that something is wrong, likely requiring a professional inspection of the electrical components or a more thorough cleaning regimen. This proactive, data-driven approach transforms you from a passive system owner into an active manager, ensuring you capture every possible kilowatt-hour from your investment.
Schedule Professional Inspection
Over a 25-year service life, environmental stress and normal wear can cause subtle issues invisible to the untrained eye. Data from system performance reviews shows that arrays undergoing biennial (every 2 years) professional inspections maintain an average 2-3% higher annual energy output than those relying solely on owner maintenance.
Scheduling a professional inspection every 2-3 years is the most effective strategy to identify hidden wear, validate the system's safety, and ensure its performance aligns with its projected 25-year financial model.
A qualified technician brings a level of diagnostic capability that goes far beyond a visual check. Their process typically takes 2-3 hours for a standard residential system and focuses on three critical areas. First, they perform a detailed electrical integrity test using a fluke meter to measure the insulation resistance of the DC cables, which should be above 1 MΩ to prevent leakage and potential fire hazards. They will also use a thermal imaging camera under full load (above 80% inverter capacity) to scan every connection in the combiner box and inverter, identifying hotspots that are even 10°C (18°F) warmer than their surroundings—a sure sign of resistance that will worsen over time. Second, they conduct a mechanical stability assessment, checking the torque of every 10th to 15th rail connection and roof penetration to ensure they are still within the manufacturer's 15-20 ft-lb specification.
A mount loosened by just 5% can reduce its wind load resistance by a significant margin. Finally, they will analyze the inverter's internal log data, which stores error codes and efficiency logs that are not displayed on the user portal. They can identify if the inverter has been frequently throttling due to overheating or if it has experienced a certain number of internal faults that indicate impending failure. This allows for planned replacement before a catastrophic failure occurs, avoiding 5-7 days of complete production loss waiting for a new unit.