How many amps should a 100w solar panel produce
A standard 100-watt monocrystalline solar panel typically produces a maximum power current (Imp) of 5.5 to 5.8 amps under Standard Test Conditions (STC), which assume 1,000 W/m² solar irradiance and a cell temperature of 25°C.
Because these panels generally operate at an optimum voltage (Vmp) of 18 volts, the real-time amperage correlates directly with this potential, while the short-circuit current (Isc) can peak between 6.1 and 6.4 amps.
In practical outdoor scenarios, environmental factors such as 15% to 20% atmospheric loss and temperature-related efficiency declines of 0.39% per degree Celsius typically result in an actual charging output ranging from 4.5 to 5.0 amps.
Peak Conditions
Under Standard Test Conditions (STC), irradiance is constant at 1,000 W/㎡, cell temperature is maintained at 25℃, and atmospheric mass is set at AM1.5.
At this time, the nominal maximum power current (Imp) of a 100W monocrystalline silicon panel is typically 5.55A.
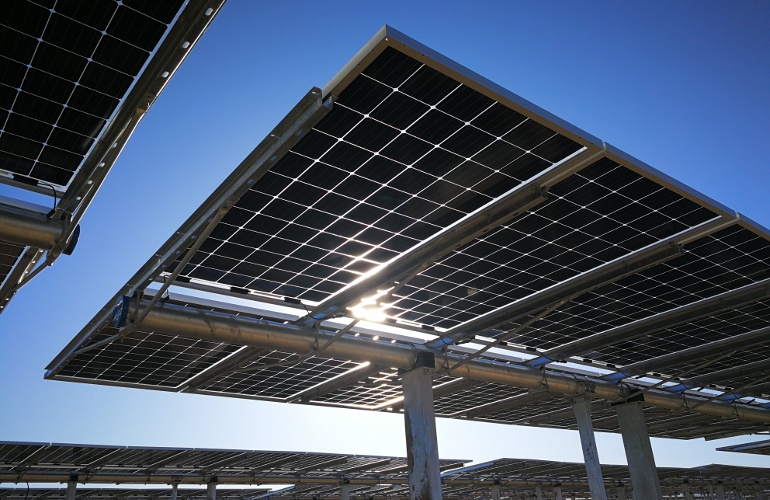
A 100W module is usually composed of 32 or 36 solar cells connected in series.
The open-circuit voltage of a single cell is about 0.6V, and the total open-circuit voltage (Voc) is distributed between 21.6V and 22.5V.
The photoelectric conversion efficiency of monocrystalline silicon modules currently ranges between 19.5% and 22%, which means that out of every 1,000 W of solar energy received per square meter, only about 200 W can be converted into electricity.
For a panel with dimensions of 1,050mm x 540mm, its actual light-receiving area is about 0.56 square meters, and the precise value of the output power under peak conditions is 100.8W.
Parameter Name | Quantitative Index (STC) | Fluctuation Range |
Maximum Power Current (Imp) | 5.56A | ±3% |
Short Circuit Current (Isc) | 6.10A | ±5% |
Maximum Power Voltage (Vmp) | 18.2V | ±2% |
Number of Cells | 36 pieces | 4x9 arrangement |
Strong Sunlight
When the outdoor irradiance reaches an extreme peak of 1,100 W/㎡, the real-time current output of a 100 W panel can briefly exceed 6.0 A.
The rate at which photons hit the silicon wafer surface to generate electron-hole pairs has a 1:1 linear relationship with light intensity.
If the light intensity drops to 500 W/㎡, the current will immediately synchronize and decrease by 50% to around 2.78 A.
In regions at 30 degrees north latitude, the effective sunshine intensity is highest between 12:00 and 14:00 at summer noon.
At this time, the atmospheric mass AM value is close to 1.0, and the energy in the 400 nm to 1100 nm band of the spectrum is most concentrated.
If the panel surface is covered with 1 mm thick floating dust, the current output will drop directly by 5% to 12% due to light scattering and absorption.
Using high-transmittance cloth-patterned glass (transmittance >91%) can improve the current gain by about 0.15 A compared to ordinary glass.
When the panel receives light, its internal bypass diodes (usually 10A or 15A specifications) will produce a voltage drop of about 0.7V.
If the module area is shaded by 10%, due to the barrel effect of series circuits, even if the remaining 90% of the area has sufficient light, the total current may drop by more than 80% due to the surge in internal resistance.
Heat Loss
The power temperature coefficient of solar panels is usually -0.38%/℃, which means that for every 1℃ the cell temperature exceeds the 25℃ laboratory standard, the output power will decrease by 0.38 W.
Under a summer temperature of 35℃, the actual operating temperature of the dark silicon wafer surface will soar to 65℃.
This 40℃ temperature difference will lead to a power attenuation of 15.2%, causing a 100 W panel to be downgraded to 84.8 W.
Although the current (Isc) will increase slightly by 0.05%/℃ (an increase of about 0.003 A) as temperature rises, the voltage (Voc) will drop significantly at a rate of -0.3%/℃.
Ambient Temperature | Estimated Cell Temperature | Actual Maximum Output Power | Real-time Current (18V) |
20℃ | 45℃ | 92.4W | 5.13A |
30℃ | 55℃ | 88.6W | 4.92A |
40℃ | 75℃ | 81.0W | 4.50A |
To mitigate the high temperature loss of more than 15%, a bottom air convection layer of more than 10 cm must be reserved during installation, which can reduce the cell temperature by 10℃ to 15℃.
Under NOCT (Nominal Operating Cell Temperature) conditions, i.e., light intensity 800 W/㎡, ambient temperature 20℃, and wind speed 1 m/s, the real output of a 100 W panel is usually only 73 W to 76 W, corresponding to a current of about 4.1 A to 4.3 A.
Correct Angles
For every 15 degrees the solar incidence angle deviates from the vertical line, the cosine loss will cause the effective light-receiving power to decrease by 3.4%.
When the deviation angle reaches 45 degrees, the irradiance received by a 100 W panel is only 707 W/㎡, and the current output drops to about 3.9 A.
If the panel is laid horizontally, the total annual power generation will decrease by 15% to 20% compared to a 30-degree tilt installation optimized for local latitude.
Single-axis tracking brackets allow the panel to maintain a peak current output state of more than 95% throughout the day.
Compared to fixed brackets, the total daily Ampere-hours (Ah) can be increased by 25% to 35%.
In plateau regions above 3,000 meters altitude, due to the thin atmosphere, UV content increases by 10% to 15%.
The current performance of a 100W panel in a cool environment often reaches an excess level of 5.8A.
Cable Length Weakens Power
There is physical resistance loss in the 5-meter-long wire from the solar panel to the controller.
Using 2.5 mm² (14 AWG) copper wire, its resistance per unit length is about 0.0076 Ω/m.
Under a current of 5.5 A, the voltage drop produced by the 5-meter double-wire round trip is about 0.42 V.
This results in 2.3 W of power being converted into heat lost on the cable.
If 4 mm² (12 AWG) wire is used, the voltage drop can be reduced to 0.26 V, and the loss ratio shrinks to 1.4%.
Wire Specification | 5 m Power Loss | 10 m Power Loss | Recommended Maximum Current |
2.5mm² (14 AWG) | 2.3W | 4.6W | 15A |
4.0mm² (12 AWG) | 1.4W | 2.8W | 25A |
6.0 mm² (10 AWG) | 0.9W | 1.8W | 35A |
The contact resistance of MC4 connectors is usually between 0.25mΩ and 0.5mΩ.
Although the loss of a single pair of interfaces is only 0.015 W, if more than five panels are connected in series, the total connector loss will reach the 0.1 W level.
PWM controller efficiency is only 70% to 75%, which will forcibly pull down the 18V voltage to 13.5V, wasting 25% of the power;
While MPPT controllers have a tracking efficiency of 97% to 99% and can convert excess voltage into current, increasing the charging current from 5.5A to around 7.2A.
Average Conditions
In average real-world lighting conditions, irradiance typically stays between 400 W/㎡ and 700W/㎡, which is far below the laboratory standard environment of 1,000 W/㎡.
For a nominal 100W monocrystalline silicon panel (size about 1,050mm x 540mm), although its maximum power current (Imp) is 5.5A, at an average light intensity of 600W/㎡, the real-time output current will drop to about 3.3A.
For a 12V system, with sunshine lasting from 8:00 to 17:00, deducting 2 hours each for low-efficiency collection in the morning and evening, the average current during the middle 5 hours is about 3.8A.
This means a 100W panel can inject 18Ah to 25Ah of electricity into a cell daily, which translates to about 220Wh to 300Wh of energy.
If you use a 100Ah lead-acid cell, under a 50% safe Depth of Discharge (DOD) limit, a single 100W panel needs 2.5 consecutive days of charging to replenish the cell from 50% to 100%.
Key Performance Indicator References:
· Average Light Intensity Current: 3.2A - 4.1A (Daily weighted average)
· Average Daily Ah Output: 20Ah - 28Ah (Depending on latitude and season)
· Single Day Energy Yield: 0.24kWh - 0.32kWh
· System Efficiency Coefficient: 0.65 - 0.75 (Comprehensive consideration of controller and line losses)
Unfavorable Weather
Cloud thickness and distribution directly determine the fluctuation range of the average current.
Slight thin cloud cover will reduce the 1,000 W/㎡ light intensity to 300 W/㎡, at which point the 100 W panel current will plummet to 1.6 A.
On cloudy days with 50% cloud cover, due to atmospheric scattering, the number of photons reaching the panel surface decreases by more than 60%, and the measured current can typically only be maintained between 0.8A and 1.2A.
In heavy rain or overcast weather, when irradiance falls below 100 W/㎡, the output current will shrink to 0.3 A to 0.5 A, sometimes failing to reach the 13.6 V minimum charging start voltage of the cell.
For a 100W module using a 36-cell series structure, even if only 5% of the surface area is shaded by tree shadows or utility poles, the total current output will slide from an average of 4A to about 0.8A instantly due to the exponential growth of internal resistance in the series circuit.
This 80% power loss caused by local shading is very common in average operating conditions.
If your installation environment has shading for 20% of the time, it is recommended to reserve 30% power redundancy, i.e., install a 130W module to offset the loss.
Conversion Discount
The type of controller plays a decisive role of 20% to 30% in the final conversion efficiency of the average current.
Ordinary PWM controllers in a 12V system will forcibly pull down the 18V peak voltage of the solar panel to the cell's current voltage (e.g., 12.6V).
This mismatch results in about 25% of the power being directly lost, making the 5.5A nominal current perform at an actual efficiency of only 3.0A under average conditions.
In contrast, an MPPT controller with 98% conversion efficiency can convert excess voltage into current through a DC-DC step-down circuit.
Controller Efficiency Comparison Data:
· PWM Solution: Input 18V/4A → Output 12.8V/4A (Loss 28.8W)
· MPPT Solution: Input 18V/4A → Output 13.2V/5.4A (Power retention about 71W)
· Equipment Self-consumption: 15mA - 45mA (24-hour standby consumes about 1Ah)
Using an MPPT controller can increase the charging current of a 100W system by 1.2A to 1.5A under average lighting.
If your system budget is over 500 RMB, choosing a 20A MPPT controller can shorten the charging cycle by about 35%.
Cable Resistance
The resistivity of the wire is a physical bottleneck for average current loss.
Using a 10-meter-long ordinary copper cable with a cross-section of 2.5 mm² (14 AWG) will produce a voltage drop of about 0.7 V when transmitting 5 A current.
This means only 17.3 V of the original 18 V output voltage reaches the controller end, resulting in about 4% transmission loss.
If the wire is extended to 20 meters, the voltage drop will double to 1.4 V, and the loss rate will climb to over 8%.
To ensure a transmission efficiency of over 97%, a 100W system is typically recommended to be paired with 4mm² (12 AWG) wire, which has a resistance of only 0.0046 Ω per meter.
Under an average current of 4A, the round-trip voltage drop for a 5-meter wire can be controlled within 0.18V, with power loss below 1W.
If the contact resistance of the MC4 connector is higher than 0.5 mΩ, the junction will produce high temperatures above 50℃ due to oxidation from long-term outdoor exposure, further increasing impedance fluctuation by 2%.
No Power When Dirty
In industrial zones or dry and dusty environments, just 15 days of not cleaning the surface can allow accumulated floating dust to block 8% to 15% of solar transmittance.
Experimental data shows that when 20 g/㎡ of dust accumulates on the panel surface, the output current will drop from 5.0 A to 4.2 A.
Maintenance and Environmental Data Density:
· Dust Shading Loss Rate: 5% - 12% (Monthly average attenuation)
· Pollen/Leaf Coverage: Local shading causes 40% - 90% current sudden drop
· Cleaning Benefits: Current recovery of 0.5A - 0.8A after wiping
· Rainwater Self-cleaning Efficiency: Can only remove about 60% of loose dust
For 100W panels permanently fixed on the roof of an RV, the average current output is often 10% lower than at a clean ground station due to the mixed influence of grease and dust in vehicle exhaust.
It is recommended to wipe with pure water and a soft cloth every 30 days, which can allow your system to obtain 15% more total power generation over its entire life cycle.
Why isn't it 8 Amps
Voltage is Higher
Many people expect a current of 8.33A based on the power formula by dividing 100W by 12V, but this ignores the 18.5V rated operating voltage (Vmp) of the 100W panel.
A standard 100W monocrystalline module is made of 36 125mm x 125mm cells in series. Each cell provides 0.5V, totaling 18V of rated output.
According to the physical definition P = V x I, 100W divided by 18.5V yields a rated current Imp of only 5.41A.
This voltage difference of about 6 V is designed to ensure that in high-temperature environments of 65℃, the panel voltage remains above the 12.6 V cell charging voltage even after a 15% drop.
If the panel was designed for 12V, its actual output voltage would drop below 10V at 35℃ in summer, resulting in 0 A current charging the cell.
Since the physical light-receiving area of a 100W panel is only 0.56 square meters, an Imp of 5.5A is already the limit at 20.5% conversion efficiency under 1,000W per square meter light intensity.
Electrical Parameter Item | Theoretical Value (8A Fantasy) | Real Specification (18V System) | Percentage Deviation |
Operating Voltage (Vmp) | 12.0V | 18.5V | +54.1% |
Maximum Current (Imp) | 8.33A | 5.41A | -35.1% |
Open Circuit Voltage (Voc) | 14.5V | 22.1V | +52.4% |
Short Circuit Current (Isc) | 9.0A | 5.9A | -34.4% |
Temperature Rise Loss
The power temperature coefficient of solar cells is usually -0.39%/℃, which means for every 1℃ the temperature rises, 100W of power will decrease by 0.39W.
When the ambient temperature is 30℃, the dark silicon wafer surface absorbs 80% of infrared energy, causing the internal cell temperature to soar to 60℃.
This 35℃ temperature difference (relative to the 25℃ standard) will cause a 13.65% power attenuation, reducing the actual output of a 100 W panel to 86.35 W.
At a high temperature of 60℃, the voltage Voc will drop by about 3 V, and although the current Isc will increase slightly by 0.05%/℃ (about 0.003 A), it cannot compensate for the 15% total power loss.
If a 10 cm ventilation gap is not reserved during installation, the backplate temperature may reach 75℃, at which point the real-time current output of a 100 W panel is usually locked below 4.5 A.
Using 3.2 mm thick high-transmittance tempered glass can reduce heat accumulation by about 2℃, but more than 10% of energy is still converted into useless heat due to thermal motion.
Conversion Efficiency
The controller type is another physical bottleneck preventing the current from reaching 8A, especially cheap PWM controllers.
Due to the lack of DC-to-DC step-down conversion circuits, PWM controllers will forcibly pull down the 18.5V panel voltage to the cell's current 13.2V, losing 28.6% of potential power in the process.
At a rated current of 5.5A, the PWM controller can actually only output 13.2V multiplied by 5.5A, which equals 72.6W of power.
In contrast, an MPPT controller with 98% conversion efficiency can convert the extra 5.3V voltage into charging current through an inductor energy storage circuit.
When generating 100W of power, an MPPT controller can amplify the 5.5A input current to around 7.5A into a 12V cell, which is closest to the 8A expectation.
However, the MOSFETs and inductors inside the MPPT controller produce 2% to 3% heat loss, and the 15mA self-consumption also takes up 0.2% of the total daily power generation.
Controller Type | Input Current | Output Current (13V) | Power Conversion Rate |
PWM Mode | 5.5A | 5.5A | 71.3% |
MPPT Mode | 5.5A | 7.4A | 97.5% |
Low-quality MPPT | 5.5A | 6.2A | 82.0% |
Line Voltage Drop
The internal resistivity of the wire results in a 1% to 5% reduction in current, especially when the cable length exceeds 5 meters.
Using 2.5 mm² (14 AWG) copper wire, the resistance for a two-way 10-meter length is about 0.15 ohms, which produces a 0.82 V voltage drop when 5.5 A current passes through.
This 0.82 V voltage drop means 4.5 W of power is converted to heat on the cable, resulting in a reduction of about 0.3 A in the current at the charging end.
If the wire specification is upgraded to 6 mm² (10 AWG), the resistance will drop to 0.06 ohms, and the voltage drop will shrink to 0.33 V, thereby recovering 3% of the transmission loss.
The 0.5 mΩ contact resistance of MC4 connectors due to long-term exposure will also induce 0.015 W of trace loss at 5.5 A current, but if the system has 3 panels in parallel, the total connector loss will climb to the 0.1 W level.
Old 1.5 mm² thin wires, when transmitting 100 W of power, can even have a line loss rate exceeding 8%, causing the 5.5 A current to shrink to about 5.0 A before reaching the cell.
Glass Reflection
The 3.2 mm cloth-patterned glass covering the monocrystalline silicon wafer has a light transmittance of 91%, which means 9% of solar photons are reflected or absorbed before entering the solar cell.
Even a slight 0.1 mm thickness of floating dust will cause a 7% drop in current output due to secondary scattering of light.
At a 15-degree tilt angle installation, rainwater can only carry away 60% of surface dirt, and the remaining 40% of stubborn dust will form a 5% persistent shading loss.
When the solar incidence angle deviates from the vertical by 30 degrees, according to the cosine law, the effective area received by the panel shrinks to 86.6%, and the current decreases linearly from 5.5A to 4.76A.
If bird droppings cover 1 cm² of the panel surface, due to local hot spot effects, the internal resistance of that series circuit will increase by more than 200%, resulting in a sudden 50% to 80% drop in the output current of the entire 100W panel.
High-quality anti-reflection coating (AR coating) can improve transmittance to 94.5%, but this only brings a 0.2A current gain, still failing to fill the 30% gap between the 8A target and the 5.5A reality.