How to Clean Different Types of Solar Modules: 5 Method Comparison
Clean monocrystalline with soft brush + pH7 solution weekly; thin-film uses <50psi water to protect coatings. Robotic cleaners boost efficiency 30% vs. manual, while non-abrasive chemicals prevent micro-scratches, maintaining peak output across panel types.
Cleaning General Dust and Dirt
Studies from the University of California, San Diego, found that dust accumulation can cause an average power loss of 0.05% per day if left unattended. Over a typical 4-week dry period, this can lead to a 5-7% reduction in your system's output. For a 10 kW residential system, that translates to a loss of approximately 50-70 kWh per month, which adds up to a noticeable increase in your electricity bill over a year. Regular cleaning of this general soiling is the most frequent and cost-effective maintenance activity, typically restoring 98-99% of the module's rated power output immediately.
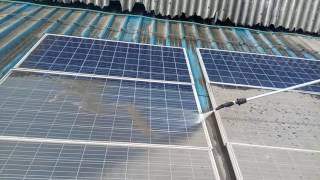
Tap water contains dissolved minerals—hardness levels can exceed 200-300 ppm (parts per million)—that leave white spots and scale on the glass as the water evaporates. This scale can permanently etch the glass, creating a haze that scatters light and causes a permanent 1-3% power loss that no amount of cleaning can reverse. If you must use tap water, a thorough squeegee dry immediately after washing is non-negotiable to prevent water spots. The cleaning should be performed early in the morning or on a cloudy day when the panels are cool to the touch (below 86°F or 30°C). Cleaning hot panels under direct sun causes water to evaporate almost instantly, dramatically increasing the risk of streaking and mineral deposits. The equipment needed is straightforward: a 100-foot garden hose provides sufficient reach for most single-story homes, a hose-end soft bristle brush (with a minimum of 1-inch bristles) is gentle on the anti-reflective coating, and a squeegee on a telescopic pole ensures a spot-free finish. The water pressure should be kept low; a pressure of less than 40 psi is safe.
Factor | Recommendation | Rationale |
Water Type | Deionized (DI) or softened water is ideal. | Prevents mineral deposits that cause permanent ~2% power loss. |
Water Pressure | Low pressure, < 40 psi. Standard garden hose pressure is 40-60 psi, so do not use a pressure washer. | High pressure can damage seals and frames, voiding warranties. |
Cleaning Tool | Soft, non-abrasive brush (nylon, >1" bristles) on a telescopic pole. | Scratching the glass permanently reduces light transmission. |
Cleaning Time | Early morning, evening, or overcast days. Panel temperature < 30°C (86°F). | Prevents rapid evaporation and streaking; ensures cleaner, drier finish. |
Frequency | Every 2-3 months in dry, dusty climates; every 6 months in less dusty areas. | Balances energy recovery with water and labor costs. A 5% performance drop is a good trigger for cleaning. |
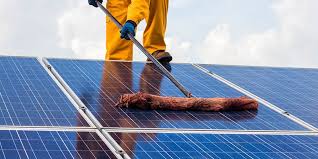
The entire cleaning process should be a gentle, flowing motion. Start by rinsing the panel with water to loosen the top layer of dust. Apply the soapy water (if using a mild, solar-safe detergent) or plain water with the brush, moving in a single direction along the length of the panel. Never use circular motions, as this can create visible swirl marks. After scrubbing, immediately rinse off all the soap and dirt.
Removing Stubborn Bird Droppings
Unlike a thin layer of dust, a single, dry bird dropping can create a significant shading effect, potentially reducing the output of an entire panel by up to 25-30%. This is because modern panels are often wired in series, and the shaded section can act as a major resistance, crippling the current flow for the whole string. Research from the National Renewable Energy Laboratory (NREL) indicates that "hard soiling" events like bird droppings can account for over 50% of all preventable energy losses in residential systems, especially in areas with large bird populations. The acidic nature of the droppings, which have a pH ranging from 3 to 4.5, poses a long-term threat. If left for more than 2-3 weeks, the acids can chemically etch the glass's anti-reflective coating, causing a permanent 2-5% power loss in the affected spot, even after the deposit is removed. Addressing droppings quickly is not just about restoring immediate power; it's a critical measure to protect your system's 20-25 year lifespan.
The key to removal is a two-step process: penetration and gentle lifting. You must first rehydrate the deposit to break its bond with the glass surface. The most effective and safest method is to use a solar panel cleaning kit that includes a telescopic pole and a brush with a built-in water feed. Fill the kit's reservoir with 3 to 5 gallons of purified water (deionized is best) and, if the soiling is severe, add a 5-10% concentration of a manufacturer-approved, mild solar panel cleaning solution.
Critical Step: Do not start scrubbing immediately. Soak the affected area thoroughly. Position the brush head just above the dropping and let the water flow over it for a minimum of 60 to 90 seconds. This soaking time allows the liquid to penetrate the dried material, softening it from the inside out. For multiple droppings or older, crusted deposits, you may need to pre-soak the entire panel for 2-3 minutes.
The dropping should begin to dissolve and slide off. If it remains stubborn, do not scrub harder. Instead, stop, reapply a fresh stream of water, and let it soak for another 60 seconds. Repeat the gentle agitation. Patience is far cheaper than a cracked panel or a scratched surface. The entire process for a heavily soiled panel might take 10-15 minutes, but the energy recovery is immediate. Removing just one major dropping can restore the full 300-400 Watts of output for that specific panel. Never use a pressure washer, as the high-pressure stream (over 1000 psi) can physically damage the solar cells inside or compromise the waterproof junction box.
Dealing with Dusty and Sandy Areas
Unlike occasional dirt, fine particulate matter like silica sand (particles as small as 50-100 microns) acts like an abrasive powder, constantly settling on surfaces. In regions like the American Southwest or the Middle East, dust accumulation rates can exceed 0.5 grams per square meter per day. This fine layer scatters and absorbs sunlight with remarkable efficiency; a deposition density of just 4 grams per square meter—about the weight of a standard paperclip spread over a desk—can reduce panel efficiency by up to 40%.
l Increasing cleaning frequency to every 2-4 weeks to prevent the formation of a hard, caked-on layer.
l Using copious amounts of water, typically 30-50 gallons per cleaning session for a residential system, to fully suspend and rinse away abrasive particles.
l Investing in a professional-grade water filtration system to eliminate dissolved minerals that can bond with the dust.
Each dry pass can introduce micro-scratches that permanently haze the glass, leading to an irreversible 3-7% reduction in light transmission over 2-3 years of improper cleaning. The only correct method is a high-volume, low-pressure water flush. Before any physical contact, you must thoroughly rinse the panel surface with a large volume of water—approximately 5-10 gallons per panel—to wash away the >90% of loose, abrasive material. Use a standard garden hose nozzle set to a "shower" or "flat" pattern, not a concentrated jet. The water pressure should remain below 40 psi to avoid driving water into sensitive modules.
Employ a brush with extra-soft bristles—nylon with a hardness rating below Shore A 70—and a built-in water feed. The critical practice is to maintain a continuous layer of water between the brush bristles and the glass surface at all times. This layer acts as a lubricant and transport medium, suspending the fine particles and allowing them to be flushed away without making direct contact with the glass.Apply zero downward pressure; the brush's weight is sufficient. Move the brush in single, straight passes along the length of the module. The final rinse is as important as the first; use an additional 3-5 gallons of water per panel to ensure all suspended silt is removed from the surface and frame. Immediately follow with a squeegee to dry the panel completely. Any standing water will evaporate, leaving behind any remaining dissolved minerals and a thin film of the very dust you tried to remove.
Cleaning Moss, Mold, and Algae
Organic growth on solar modules is a slow but serious problem that primarily affects systems in climates with high average humidity, typically above 70%, and frequent rainfall. Unlike dust, moss, mold, and algae are living organisms that physically attach to the panel surface. A study of systems in coastal regions over a 5-year period found that biological soiling can lead to an average annual energy loss of ~2%, compounding to over 10% if left untreated for the panel's first 5 years of operation. The loss mechanism is twofold: the physical biomass blocks light, and the underlying microbial colony secretes acidic compounds that can slowly degrade the ethylene-vinyl acetate (EVA) encapsulant. This can lead to a permanent reduction in optical transmission. The growth often starts in the shaded, moist micro-climate along the bottom edge of the panel's frame, where condensation persists 20-30% longer than on the central glass.
l Application of a specific chemical cleaner to dissolve the organic material and kill the root structure.
l Extended contact time, typically 5-10 minutes, to allow the solution to penetrate the growth.
l Mechanical agitation with a soft brush to dislodge the now-deceased organism.
l Thorough rinsing to remove all residual cleaner and organic debris.
Avoid household bleach (sodium hypochlorite) at concentrations above 1-2%, as its high alkalinity can, over multiple uses, damage the aluminum frame and silicone sealants. Using a pump sprayer, apply the solution generously, ensuring complete coverage, especially along the bottom edge where growth is concentrated. A typical mixture is a 3:1 to 5:1 ratio of water to cleaner. The cost for a 1-gallon concentrate is approximately 20−30 and can make up to 20-30 gallons of ready-to-use solution.
Factor | Recommendation | Rationale |
Cleaning Agent | Commercial solar panel bio-cleaner. | Formulated to be effective yet safe for panel materials; avoids long-term corrosion risks. |
Contact Time | Let the solution dwell for 5-10 minutes. Do not let it dry. | Allows chemicals to break down cellular walls and kill the organism at the root. Less than 3 minutes is often ineffective. |
Agitation | Use a soft brush (e.g., nylon, ≥1.5-inch bristles) with a water feed. | Gentle mechanical action is needed to lift the deceased growth without scratching the glass. |
Post-Cleaning Rinse | Rinse with ≥5 gallons of purified water per panel. | Removes all chemical and organic residue, preventing new growth and potential streaking. |
After the 5-10 minute dwell time, agitate the area with a soft brush. The growth should easily slough off. If it remains, do not scrub forcefully; instead, reapply the solution and wait another 5 minutes. The final rinse is critical. You must use a generous volume of water—at least 5 gallons per panel—to ensure all traces of the cleaning agent and the dissolved organic matter are completely flushed from the surface and the frame channels. Any residue left behind will attract new dirt and spores, accelerating the recurrence of the problem. Follow immediately with a squeegee to dry the surface.
To prevent regrowth, consider applying a proprietary anti-static, hydrophobic coating designed for solar panels. These coatings, which cost around 0.50−1.00 per square foot to apply professionally, create a surface that is less hospitable to organic attachment and can reduce the rate of recolonization by over 80%, extending the cleaning cycle from every 6 months to every 18-24 months. The entire cleaning process for a 300-square-foot array affected by organic growth will take about 60-90 minutes and consume roughly 25-40 gallons of water, but it can restore ~98% of the lost performance and protect the long-term value of your investment.
Winter Snow and Ice Removal
A blanket of snow can bring a solar array to a complete standstill, causing a 100% power output loss. The weight is also significant; just 1 inch of wet snow can exert a pressure of over 1.5 pounds per square foot on your roof structure. However, the decision to remove snow is not always straightforward. A light dusting of less than 1-2 inches will often melt and slide off relatively quickly on its own, especially if the panels are dark-colored and angled at 30 degrees or more. The key metric is the irradiance threshold; once incoming solar radiation reaches approximately 200 watts per square meter, the panels will begin to generate enough heat to initiate a melting process, even at ambient temperatures well below freezing. The most efficient strategy is often patience, as the slick, glass surface of panels facilitates shedding much faster than a standard roof. The primary goal of manual removal is to accelerate this process during periods of heavy, persistent snow cover that would otherwise block light for 3-5 consecutive days or more, ensuring you recapture valuable energy production during the short daylight hours of winter.
The tempered glass on solar panels is incredibly strong, but a sharp point of impact at a 90-degree angle can cause micro-fractures or catastrophic failure. The only tool you should use is a solar panel snow rake with a soft, non-abrasive polyurethane foam head. These specialized tools have two critical features: an extremely long handle (typically extending 15 to 25 feet) to keep you safely on the ground, and a foam head that glides over the glass without making direct contact.
Safety First: Never climb onto a snowy or icy roof to clean panels. The risk of a personal fall, which has a >80% probability of resulting in serious injury from a single-story roof, far outweighs the energy production benefits. Furthermore, you risk damaging the roof itself and the panel mounting system.
You do not need to clear every last flake; removing the main bulk of the snow (about 70-80% of the coverage) is sufficient to allow sunlight to hit the panel and initiate the melting process for the remaining thin layer. The best time to do this is in the late morning or early afternoon on a sunny day, when the ambient temperature is highest and the sun is already working to loosen the snow's bond to the glass. For ice, the approach is different. If a layer of ice has formed, do not attempt to break it. Applying force can crack the glass. Instead, allow the sun to melt it naturally. While waiting, your system will still produce 5-15% of its potential output on clear days, as diffuse light can penetrate thin ice.
Action | Recommended Tool/Method | Parameters & Rationale |
Removing Snow | Plastic-bladed snow rake with a foam edge. | Maintain a >10° angle between the tool and the glass. Clears a 60-cell panel in 2-3 minutes. |
Addressing Ice | Allow natural melting. | Applying de-icer (e.g., salt, chemicals) is prohibited; it voids warranties and corrodes frames and wiring. |
Water Usage | Do not use water. | Pouring water on frozen panels can cause thermal shock and rapid re-freezing, creating a thicker ice layer. |
Effectiveness | Target >70% snow clearance. | This exposes enough surface area to restart the snow-melt effect, which can clear the remaining 30% within 60-90 minutes. |
A 10 kW system might lose 30 kWh on a snowy winter day, valued at about 4.50,compared to asummer loss of 60 kWh worth 9.00. Therefore, the effort and time invested must be weighed against this marginal gain. For most homeowners, clearing snow after a major storm that deposits 6 inches or more is the most cost-effective approach, potentially restoring 80-90% of a day's winter production. The process for a full 5 kW residential array should take no more than 20 minutes and can be the difference between zero export and generating a meaningful amount of power during the darkest months of the year.